Artful Function

Yesterday I wrote about my love for functional art.

This morning I’m thinking about how simple function can still be artful. That creations built purely for function can actually be elevated to art form, by way of their pure inventiveness.

The Bohemian would not necessarily call himself an artist, but his inventions, ever-practical in their execution, are simply exquisite.

Take his current passion- worms. He began with seven of them and a mound of soil. He has increased their numbers over the last year and a half to tens of thousands. They live off of what we discard: paper, cardboard, and kitchen scraps. What they give us in return are their ‘castings,’ or poop. Worm castings are an excellent source of fertilizer for all plants, and a great enrichment for the soil. Worms turn our trash into treasure.

And what the Bohemian has done to support the worms is also a demonstration of his artful ability to create functional tools from other people’s waste. His evolving worm farm shows that even the most functional of construction can certainly be rooted in artistic vision.

2015-09-29_farm outside
the worm farm


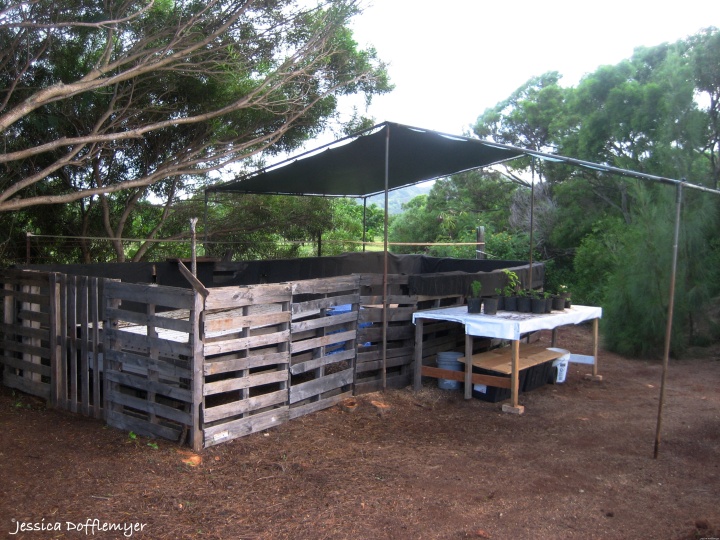
This is the worm farm, the Bohemian’s epicenter. Originally it was a small clearing in the trees. He has significantly expanded the space over the last year.

2015-09-29_inside farm
inside the worm farm


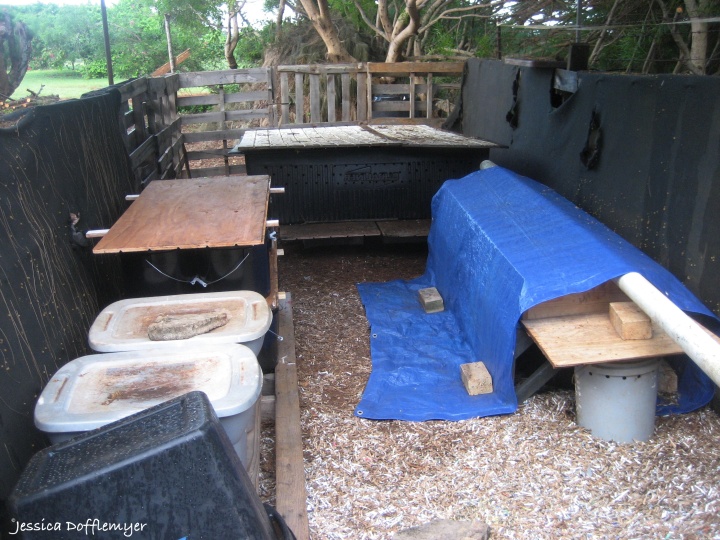
It began with reclaiming an old truck bed liner and putting it on blocks. He drilled air holes on the sides and it became the home for the worms. The surrounding pallets were all in the give-away pile, now serving as a fence to keep out wild pigs. The black cloth on the sides is old ground cover that was slotted for the dump. Under the blue tarp is an unwanted bathtub, which now acts as a drying station for the castings. All of the wood you see were scrap pieces left over from other farm projects, which the Bohemian gathered and utilized.

Notice the shreds on the ground inside the interior of the area? That’s cardboard and paper. Our family never takes paper or cardboard to the recycling center, because the Bohemian regularly shreds all of it with a basic, office-style paper shredder. We have mounds of the stuff. And it’s a key ingredient in keeping the worms fed and giving their home a balanced moisture.

It’s apparent that I am in awe of my husband’s inventiveness. I know I’m biased in my showcase, here. But even if the man were not the love of my life, I would still be most impressed with how one human expresses the creative spirit through purely functional means.

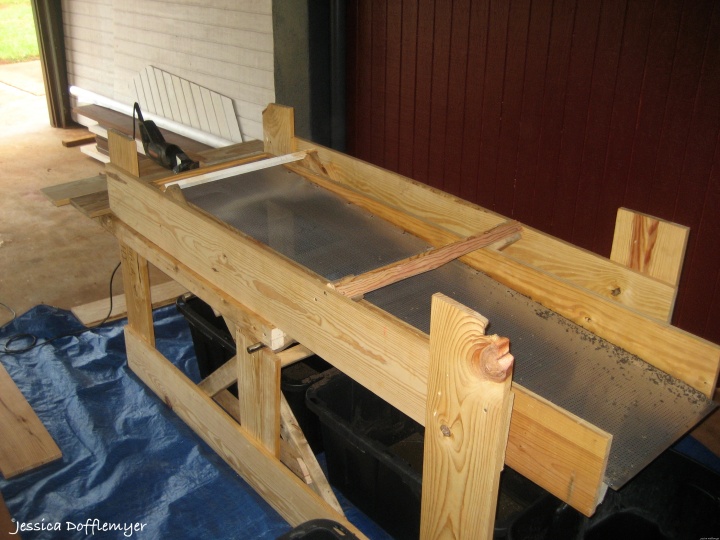
Hence, his most recent invention, the sifter. With the worms now producing a large amount of castings, the idea is to have a machine that can sift the clumps, separating any cocoons or stray paper pieces. This saves time and energy when dealing with large batches, and produces a finely sifted fertilizer with a multitude of uses in the garden.

The sifter that the Bohemian thought could do the trick was available online for $2,500, not including shipment to Hawaii. As I was slicing red peppers in the kitchen, he was carefully studying the images of this machine on his iPad. Not long after his web search, he’d wandered downstairs to the garage, where soon the sounds of drills and saws were drifting to my ears from down below.

What ensued was just as focused, passionate, and brilliant as any painter splashing color across a canvas. For days, he was coming home from work and moving straight to the sifting machine project. He would work into the night, long after dark. Sometimes I would bring him water, as he was so enthralled with his creation, he’d forget to drink.

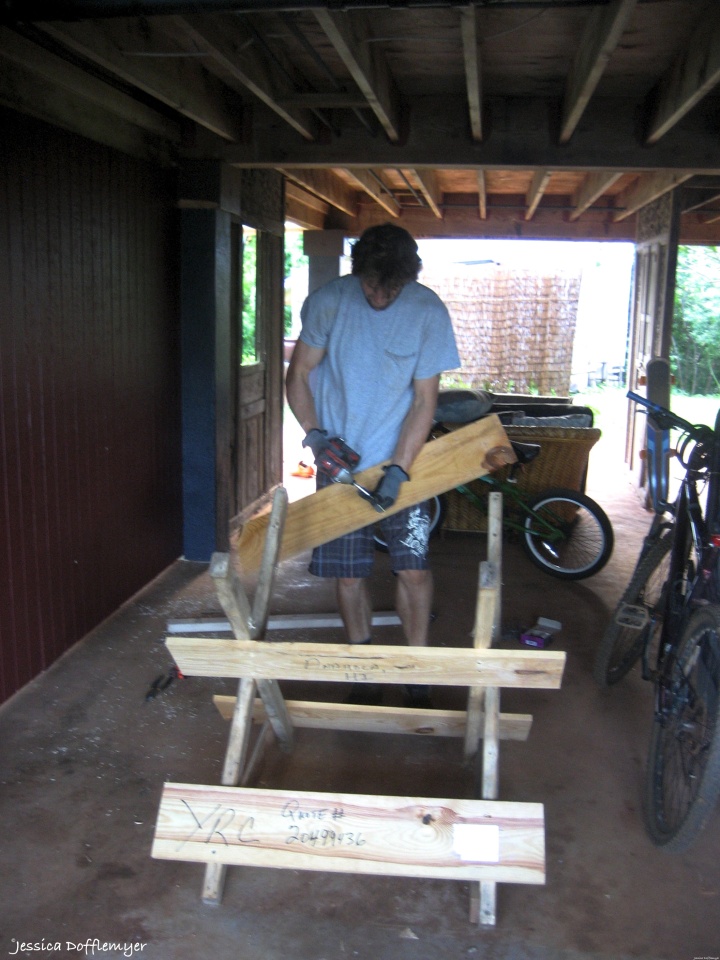
Not everyone can build structures. For those with the knack, they typically go to a hardware store and purchase the materials needed. It takes a special kind of builder (a very artistic one, I would venture) to know what materials are needed, and to then try to find them in the discarded scraps of what other builders have tossed aside.

The main frame of the Bohemian’s sifting machine is all built from wood that was the crate housing a huge piece of machinery delivered to the farm last year. At the time, he offered to disassemble all of the wood planks and brought them home for future use.

early stages of the sifter project


Other pieces of the sifter come from old PVC pipe and an abandoned curtain rod. He did purchase the screen, itself, when he found that using vinyl window screen was not solid enough for the job. The motor of the sifter is a sawzall that was left behind by a previous tenant at our house.

making progress
making progress


The video below, is only phase one of the sifter project. Since the filming, he’s already added wheels for smoother traction, adjusted the angle of the sifting bed, and modified his catchment system underneath. The footage is amateur, but hopefully it conveys the magic I sense when I see trash become treasure, as it is constructed to be of use, rather than waste.

The worms are experts at this. And, clearly, so is my husband.

Function that is artful and greatly needed in a disposable world.

Good job, Bohemian!!


Butterflies and Plywood Subfloors

Not long ago, I posted photos of caterpillars devouring the Crown Flower tree in our yard. This plant is the life force that allows the Monarch butterfly to create the cocoon necessary to house its metamorphosis.

2015-09-25_caterpillars cocoon

We watched as every last leaf was eaten, then wondered where on earth all of those brightly striped, freshly stuffed, caterpillars crawled off to. We inspected under the eaves of the house and all of the neighboring tree limbs, never finding any cocoons hanging.

(My original post did feature the one beautiful cocoon we found attached to a Crown Flower leaf, glistening golden in the sunlight. Within days, the ravenous caterpillars had digested the entire leaf from which it hung, leaving the cocoon to fall to the ground. Though I tried to re-hang it with a string, I think the damage had been done in the fall, and a butterfly never emerged).

Just this week, we have begun to spot Monarch butterflies flitting about our yard. It appears as though the transformation has occurred!

Not only are butterflies aflutter among the foliage, the Crown Flower tree is pushing out fresh leaves, seemingly unfazed by the sacrifice it offered.

2015_09-25_crown flower bud

But what does this have to do with plywood subfloors?

Well, as change darts about mid-air, the transformation has been afoot in our abode, as well.

Since our family moved into our home about a year and a half ago, it’s been a slow process of home improvement projects. We’ve had plenty of dreaming, and lots of prioritizing. Our dwelling is rich in renovation potential, but our budget is nearly zero.

I am continually in awe of the Bohemian’s incredible knack for utilizing materials at hand to achieve the fullest potential. Hence, our revamp endeavors have been carefully calculated, and far from cookie cutter.

So a few weeks ago, as the caterpillars were munching, the Bohemian and I were working on our own evolution. We were investigating carpet in the bedroom. I’ve always appreciated bare floors, and have never understood why anyone would put carpet in a home built in the moist climate of the tropics. In our case, the past home owners opted for a white Berber rug, which is ever impractical, as we are situated on a farm surrounded by red dirt.

The amount of moisture in our island air naturally settles into the fibers of carpeting, inevitably creating must and mold. The breathability of the master bedroom was such a challenge, that over a year ago, the Bohemian and I gave up sleeping there, moving the king size bed into the living room, where there was better air flow.

When we decided to lift a small corner of the carpet in the master bedroom closet, we discovered what we already knew was there- a plywood subfloor. As rough as it was, it still seemed better than dirt-stained, moldy carpet. And it was coming up, surprisingly fast. Within a few minutes, we had the closet completely cleared.

Nearly as crazed as a caterpillar on a Crown Flower leaf, the Bohemian and I excitedly began to tear into the carpeting of the whole room. We made progress quickly, and it felt fantastic to remove ancient layers from the floor.

2015-09-25_carpet subfloor

I’d never taken on a project like this, and I was thankful to have the assistance of several informative DIY blogs (“Do It Yourself” – for those of you, like me, who needed a hint on the acronym), that chronicled experiences in trying to transform a plywood subfloor into something presentable.

Though I’m not ready to convert the Archives into a DIY blog, I will share our experience in this flooring renovation endeavor.

Pulling up the carpet was easy, the real work came after…

The junky plywood subfloor, full of paint stains, plaster goop, and rough edges, all needed to be sanded.

2015-09-25_bare subfloorWe wanted a very fresh start, which meant that the Bohemian and I ended up sanding, and sanding, and sanding. By the time we were done, the whole room smelled of fresh wood.

The Bohemian was on the belt sander and I was on the palm sander, focusing on the edges and corners that the Bohemian couldn’t reach. The belt sander was much more powerful and took a lot more muscle. We were both on our hands and knees, sanding a room about 300 square feet. We used 40 grit sand paper on the first pass, and then 80 grit sand paper on the second pass. We estimate that we sanded for a total of about eight hours. This, I do not recommend.

Initially, we thought that renting a ‘walk-behind’ sander would be unnecessary for the relatively “small” size of our room. But in hindsight, we see that it would have been much faster to use a larger sander, especially since we were taking great care to get the wood to a very fresh layer.

The sanding process creates a lot of dust, and we both wore respirators, kept the windows open, and ran a fan inside the closed doors of the room. We also kept a shop vacuum on hand, and continually sucked up the accumulating dust.

2015-09-25_sanded

Once the room was sanded, we vacuumed the room very well. Then, we applied a coat of pre-stain to the floor.

2015-09-25_prestain floor

After that dried, we sanded it again, this time with 200 grit sand paper. Then we vacuumed and cleaned the floor again. The next step was staining the plywood.

The Bohemian had chosen a stain color called “Harvest Gold.” When it was first applied it had an orange-ish tint to it, that made us wonder if we’d chosen the wrong shade.

2015-09-25_stained floor

But we found that when we applied the first layer of polyurethane finish coat, the stain darkened.

We used a water-based, interior finish coating, and followed the three application recommendation. Each coat needed 24 hours to dry, so this process took several days. By the time the third layer of finish was on, the Harvest Gold stain had deepened and warmed to a pleasant honey color.

2015-09-25_finish coat complete


2015-09-25_final floor


2015-09-25_rug

Now, I’m not going to say that our floor is showcase-ready. It’s a plywood subfloor, so there’s no hiding that. Despite the fact that the ‘distressed’ look is in vogue right now, this room still wouldn’t make the grade in the shabby chic world.

It is, however, clean! Fresh. Wood, not carpet! And the color tones are much more pleasant on the eye.

In summary, the poet in me wants to express the beauty of metamorphosis.

The pragmatist in me wants to provide a checklist of how we accomplished our transformation.

Here it is:

  1. Tear out carpet in strips that can be rolled into black trash bags.
  2. Pull up all staples from the plywood subfloor.
  3. Sand the floor with 40 grit sand paper
  4. Second pass the floor with 80 grit sand paper
  5. Vacuum all dust until the room is very clean
  6. Apply a pre-stain to the floor to help absorb the stain that will be applied next
  7. Sand the pre-stained floor with a 200 grit sand paper to smooth
  8. Vacuum all dust again
  9. Apply the stain and let it dry overnight
  10. Apply the first layer of a polyurethane finish coat and let it dry for 24 hours
  11. Apply two more layers of finish coat, allowing 12-24 hours between applications
  12. Enjoy your transformed room!
courtesy of Earth Gifts: Healers and Messengers